|
|
|
|
Beginning Nature and Wildlife Photography People frequently ask me how to get started in Nature and Wildlife photography. I find this question a bit humbling since I’m still a beginner, just starting my third year. However, my newbie status may be useful because it’s been too soon to forget anything. Different people will have different opinions on how to start in this terrific hobby. I’m only going to address the way that I’ve done it and the products I’ve used, so that I can speak to you from direct, personal experience. I can, in good conscience, highly recommend the path that I’ve taken for one simple reason: It’s been more and more fun every step of the way. There are four areas that I consider critical here:
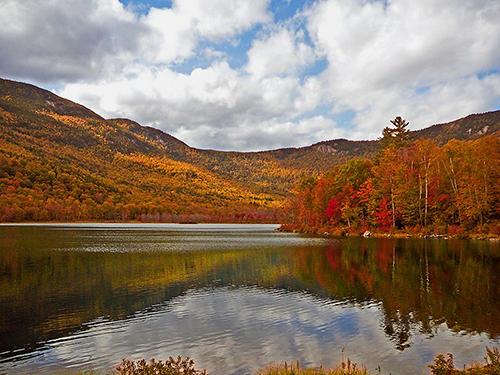
Cameras, Lenses, and Filters I started with a digital point and shoot camera, the Panasonic Lumix DMC-TZ1. The TZ1 was easy to learn and easy to carry. It takes wonderful portrait and landscapes pictures. This photo was taken in the White Mountains of New Hampshire with the point and shoot:
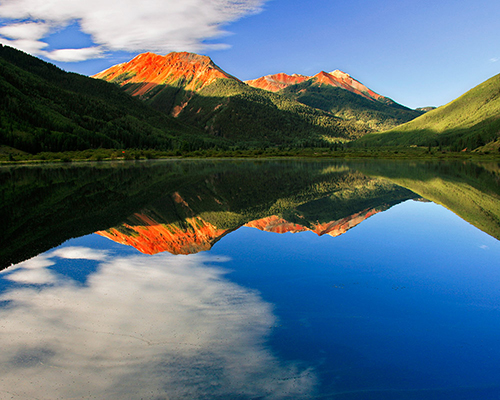
I think everyone should start with a point and shoot. Point and shoot’s are relatively inexpensive and will let you produce quality photos immediately with minimal investment, while you learn if photography is a hobby you want to pursue. I used the TZ1 for my first year. Point and shoot’s do have some major limitations. They are not the best choice for taking action photos, even though many, including the TZ1, do provide a “burst” mode for taking multiple frames per second. Also, point and shoot’s do not have a wide selection of interchangeable lenses. Some of them, including the TZ1, only work with one lens. If you’re interested in moving to the next level of landscape and nature photography like I was, it’s time to move up to an entry-level digital Single Lens Reflex camera along with a couple of lenses and filters. My entry-level DSLR was Canon’s XTi. The XTi provided many advantages over a point and shoot, including the ability to reliably shoot 3 frames per second, which is just about the minimum speed needed to get birds in flight. It also provided the ability to use multiple lenses. I bought two lenses with the XTi: a Canon 17-85mm wide angle lens, primarily for landscape photography, and a Canon 70-300mm telephoto lens, primarily for animals. I also bought two filters, which I consider essential for landscape photography: a polarizer and a graduated neutral density filter. Both of these filters help the camera deal with extreme lighting situations in a manner that preserves details in the very light and very dark areas of the photo. DSLR’s also provide the ability to store photos in the RAW format. I’ll talk more about RAW later. I used the XTi during my second year of photography. This photo, of Crystal Lake in the Colorado Rockies’ San Juan range, was taken with the XTi and the 17-85 lens on a tripod. I also used the graduated neutral density filter to compensate for the brightness of the sky compared to the reflection in the water.
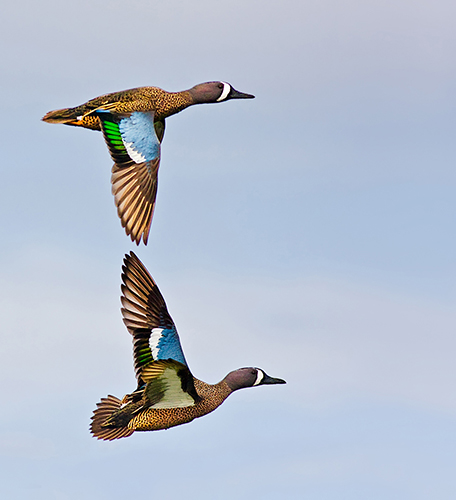
At the end of my second year, I wanted to move up another level in bird photography. I purchased Canon’s mid-range DSLR, the 40D. The 40D provides the ability to shoot 6.5 frames per second, along with somewhat better autofocus than the XTi. I also wanted a longer, faster lens. Thanks to great advice from friends, I bought a Canon 400mm 5.6L lens. The 400 has much faster autofocus capability than the 70-300. This photo, of Blue-winged Teals at Green Cay Wetlands, was taken with the 40D and 400 5.6L. I never would have gotten this shot with the 70-300 lens:
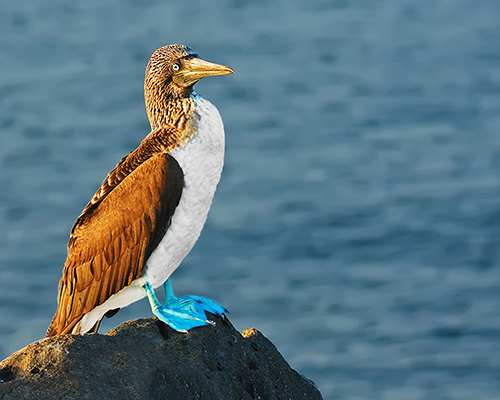
My wife and I recently took a trip to the Galapagos islands. I knew the animals would frequently be too close for the 400. A friend loaned me his 100-400mm lens to try it for a couple of days and I liked it, so I rented one for the Galapagos trip. The 100-400 is a trade-off on the 400. The 100-400’s zoom capability is perfect for a situation like the Galapagos, where many animals are too close for a 400 “prime” (i.e., fixed focal length) lens. However, the trade-off is that 100-400 is significantly slower than the 400 prime when it comes to autofocusing on birds in flight. This Blue-Footed Booby was much too close for the 400, but perfect for the 100-400, which I had zoomed to 120mm:
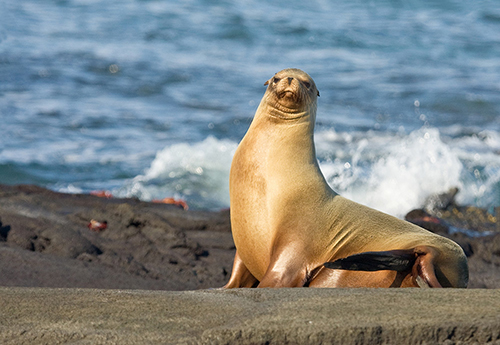
I am very happy with my current camera, lenses and filters. Although I may be upgrading in the future, especially to take advantage of new technology, I plan to stay with my current hardware for the foreseeable future. I never planned my progression from a point and shoot to an entry level DSLR to a midrange DSLR. However, I couldn’t have planned it better if I tried. I highly recommend this path to any beginners, along with the 17-85 wide angle lens for landscape photos. The one thing I would change is that I would recommend starting with a 100-400 for the initial DSLR zoom, rather than the 70-300, because the 70-300 always felt rather limited. The Craft of Taking the Photos OK. Now we have our camera and we’re ready to take some pictures. I’ll briefly discuss two areas of the craft: exposure and composition. Exposure deals with the amount of light that the camera uses to process each photo. Composition deals with the way you frame your photo so that it accurately represents whatever you want the viewer to see. Volumes have been written on both subjects. My intent here is to give you some basic information that helped me get started. Cameras manage exposure, or the amount of light that is processed for each photo, by controlling three things: Aperture size, or the size of the “pupil” in the “eye” that allows light to enter the camera, Shutter Speed, or how long the “eye” is opened, and ISO, or how sensitive the “retina” (the camera’s sensor) is to the light entering through the Aperture. Point and shoot cameras, including the TZ1, usually have limited settings available for controlling exposure. You should read the manual closely, see what settings are available, and then experiment. Try different combinations, including preset exposures for certain scenes, such as Sand, Snow, and Landscapes. And be sure to experiment with different Exposure Compensation settings and ISO values, which are adjustable in most point and shoot’s. DSLR’s provide many more exposure choices, including Aperture priority, Shutter Speed priority, Program mode (where the camera chooses the Aperture size and Shutter Speed for you), and Manual mode (where you choose both the Aperture size and the Shutter Speed). To fine tune your exposure, you can also adjust the ISO value and the Exposure Compensation value. For beginners with DSLR’s, I recommend starting in Aperture priority while experimenting with different aperture settings, ISO values and Exposure Compensation values. After you’re comfortable with Aperture priority, then move on to Shutter Speed priority and Manual priority. One of the many advantages of digital photography is that you can see the results of your shots immediately on the camera’s display. If any areas of the photo are blinking, that means they were over- or underexposed, which will result in a lack of detail. To get rid of the “blinkies,” adjust the Exposure Compensation and the ISO settings and try again. Cameras also provide histograms to help you determine if a photo has been properly exposed. Histograms will be a subject for a future article. Composition is the way you frame, or organize, the content of your photo. A few suggestions on composition have been very helpful to me. The first one is simply to visualize the way you want your photo to look before you take the shot. Think about whatever it is that has drawn your attention and the best way to place it in the photo, so that it also draws the viewers’ attention. This conscious visualization process, which only takes a few seconds, has made a big difference to me. The second suggestion is to not center the primary object of attention. If you put the primary object of attention in the center of the photo, many viewers’ eyes tend to lock onto it and not move through the “flow” of the photo. Along with its placement, the direction that the primary object is facing should be towards the “far” side of the photo, so that it has more “room” and does not give viewers’ the feeling it is “trapped” in the frame. The third suggestion is to photograph wildlife at eye level whenever possible. Most people are accustomed to either looking up or looking down at wildlife. Eye level provides a different perspective. I think it’s more interesting to see things from the animal’s view of the world. It conveys something special to the viewer if you can make eye contact with your subject at its level. I took this shot of a Galapagos Sea Lion at eye level simply by kneeling down on some rocks. The Sea Lion’s body is facing the far side of the photo, so the viewer doesn’t feel the animal is trapped in the frame. I feel compelled to tell you that the Sea Lion was drop-dead gorgeous.
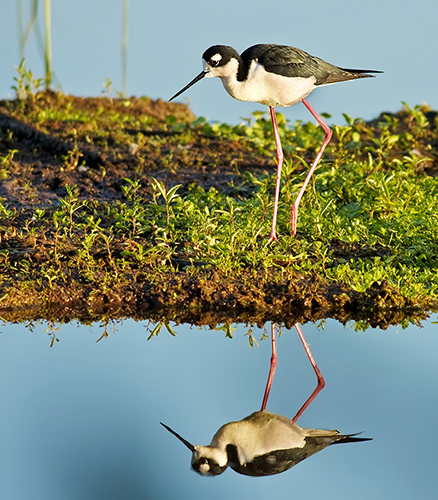
This shot of a Black-necked Stilt was taken by lying flat on my stomach on the boardwalk at Wakodahatchee Wetlands. Before I laid down, I did look both ways to be sure no pedestrians were approaching. It’s always best for photographers to be courteous to others, and it’s not much fun to be kicked.
These suggestions on exposure and composition have significantly helped me. I hope they can help you. And please remember, suggestions are not rules. The Software One of the things I like most about digital photography is the ability to develop, or post-process, the photo files with software in my computer, rather than using a physical darkroom or, even worse, giving my film away to someone else to process. Doing it with software is easier, less expensive, and more forgiving, because you can always start over. For my first two years, I used Photoshop Elements, Adobe’s entry-level post-processing tool for beginners. Elements offers most of the functionality of Adobe’s high-end product, Photoshop CS3. However, Elements is easier to learn and far less expensive than CS3. Just recently, I upgraded to CS3. The learning curve for CS3 has been much simpler because of my experience with Elements. CS3 provides several things missing in Elements, including a higher degree of precision with many tools, additional functionality, and the ability to automate repeatable series of actions. Both versions, Elements and CS3, provide the capability to process the RAW format, as well as the JPG format, of camera files. RAW files contain more data than JPG files, and therefore provide more post-processing capabilities. I recommend starting with Elements and then, if and when you feel the need, moving up to CS3. There are many excellent books, web sites, and forums that provide useful tutorials on both versions of Photoshop. The Emotional / Spiritual Thing When I started spending time outdoors for photography, I noticed that I became more aware, more into the moment. I also noticed that I was not doing any negative thinking. In fact, I was doing less thinking altogether. Less thinking, more seeing, and more feeling. What was I seeing? The incredible beauty all around me. What was I feeling? Well, more grounded, for sure. More Here and Now. More filled with humility to be a part of the natural beauty that surrounds me everywhere. Even as I sit here writing these words, I feel awestruck by nature’s beauty. And that’s what I try to achieve with my photos. At first I was just trying to make pretty pictures. Now, however, I’ve moved from pretty pictures to a much different goal, and I owe a big thanks to Richard Bernabe for helping me realize it. Now I try to make photos that enable others to feel the awesome, amazing beauty that I feel when I’m out there. That’s the story of my journey as a beginning photographer, and I’m sticking to it. There are many ways to take this trip. It doesn’t really matter whether you do it with my suggestions or any other way. The main thing is to just get out there and start taking photos. Everything else will take care of itself. To quote Bret Edge, “A bad day in the mountains beats a good day in the office.” |
|
|||||||||
|
|
||||||||||
|
|