|
Macro Photography
by Jake Paredes
 In the summer of 2007, after the migratory birds had left South Florida and the weather turned discouragingly hot and humid for long outdoor photography sorties, I found myself wanting to use my camera and lenses and improve my skills. I tried to photograph the backyard birds but after a week of looking at pictures of grackles and blue jays, I knew I had to find some other subjects to photograph. My son Jay suggested macro photography and he acquired the Sigma 150mm f/2.8 macro lens. After seeing some of his macro shots, I decided that I too needed a macro lens. I searched the classified ads for used macro lens daily until I found one I could afford, a used Tamron 90mm f/2.8 macro lens. In the summer of 2007, after the migratory birds had left South Florida and the weather turned discouragingly hot and humid for long outdoor photography sorties, I found myself wanting to use my camera and lenses and improve my skills. I tried to photograph the backyard birds but after a week of looking at pictures of grackles and blue jays, I knew I had to find some other subjects to photograph. My son Jay suggested macro photography and he acquired the Sigma 150mm f/2.8 macro lens. After seeing some of his macro shots, I decided that I too needed a macro lens. I searched the classified ads for used macro lens daily until I found one I could afford, a used Tamron 90mm f/2.8 macro lens.
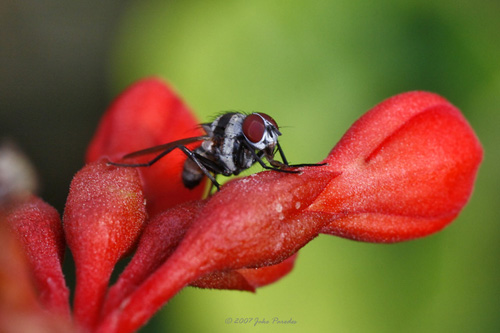
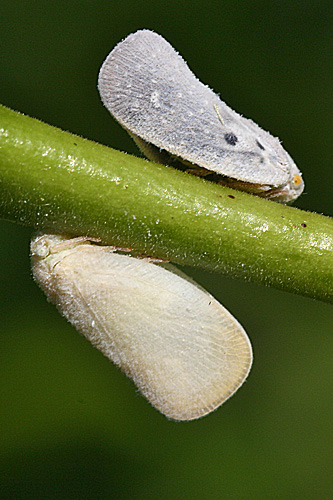
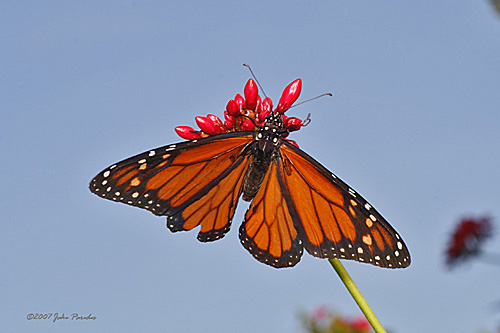
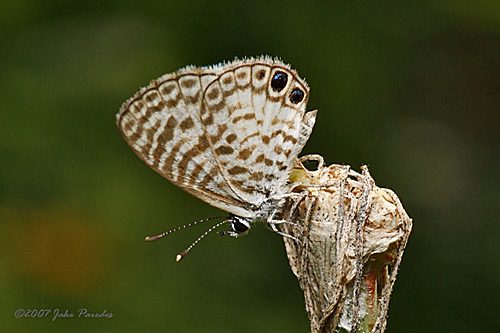
From my first macro pictures, I knew I had found something that could keep me busy and immersed in photographing the mysterious world of insects and other small creatures and objects, even the very fine print of any document and labels on bottles. Once on the computer monitor, they all become readable.
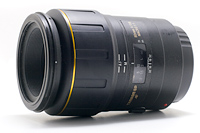
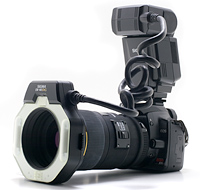
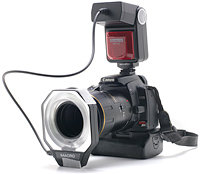 To begin with, I have the Canon EOS Rebel XTI (400D) as my primary macro camera. I also own a set of extension tubes that can adapt almost any lens for macro work. I also own a close-up lens for one of my lenses but all these have not produced an image comparable to that of a dedicated macro lens. I have used the extension tubes with the macro lens and the results have been highly satisfactory. About 6 months ago, I acquired a reasonably priced e-TTL ring flash to complement my macro lens. To begin with, I have the Canon EOS Rebel XTI (400D) as my primary macro camera. I also own a set of extension tubes that can adapt almost any lens for macro work. I also own a close-up lens for one of my lenses but all these have not produced an image comparable to that of a dedicated macro lens. I have used the extension tubes with the macro lens and the results have been highly satisfactory. About 6 months ago, I acquired a reasonably priced e-TTL ring flash to complement my macro lens.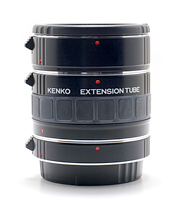
Taking pictures of insects is definitely not a cake walk. One has to be stealthy in approaching the subjects; no sudden or jerky movements, just slow fluid motions. Never cast your shadow on your subject because doing so will make it flee.
Being in good physical condition will greatly help. At times you will find yourself in very unusual positions to take the shot that you always wanted of an insect under a blade of grass on your lawn. Many times, I found myself lying flat on my stomach just to get a low angle on a creature that insists on getting much lower than I can position my camera.
Macro photography involves very close distances between the lens and the subject, which results in a very shallow depth of field. The closer you get, the shallower the DOF, and the shallower the DOF, the more likely you won’t get a sharp picture. To compensate for the shallow DOF, I use a very small aperture, f/16 and up. The small aperture means less light can get to the sensor. This could mean underexposed images, so a flash unit is necessary.

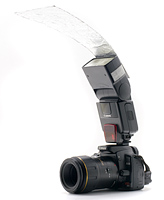 When doing macro, I set my camera to manual mode, usually at 1/200s (max flash sync speed) f/16, ISO 100, and the lens at manual focus. When I’m using my Speedlight 550 EX, I use a bounce card to get the light to my subject. The drawback to this setup is the light comes only from the top (landscape mode) or from the side (portrait mode). When the subject is hiding underneath a leaf, the flash cannot illuminate it. If you are a contortionist, it might work for you. I set the Speedlight on high-speed sync at -2/3 stop. When doing macro, I set my camera to manual mode, usually at 1/200s (max flash sync speed) f/16, ISO 100, and the lens at manual focus. When I’m using my Speedlight 550 EX, I use a bounce card to get the light to my subject. The drawback to this setup is the light comes only from the top (landscape mode) or from the side (portrait mode). When the subject is hiding underneath a leaf, the flash cannot illuminate it. If you are a contortionist, it might work for you. I set the Speedlight on high-speed sync at -2/3 stop.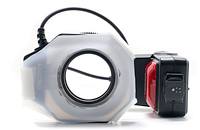 But since I acquired the Ring Light, I have been using it to illuminate my subjects no matter where they are. My Ring Light, being affordable, does not have the adjustments of the more expensive models, so I set the FEC on the camera to -2/3. Some flashes have a built-in FEC adjustment. The inexpensive e-TTL ring flashes do not have this feature, so to control the flash power you will need to set it through your camera's internal menu settings for Flash Exposure Compensation (FEC). You can also create a diffuser for the front of your flash to reduce its power. But since I acquired the Ring Light, I have been using it to illuminate my subjects no matter where they are. My Ring Light, being affordable, does not have the adjustments of the more expensive models, so I set the FEC on the camera to -2/3. Some flashes have a built-in FEC adjustment. The inexpensive e-TTL ring flashes do not have this feature, so to control the flash power you will need to set it through your camera's internal menu settings for Flash Exposure Compensation (FEC). You can also create a diffuser for the front of your flash to reduce its power.

 Even with the FEC set, the light from the non-E-TTL flash can be harsh so I devised a diffuser from a plastic milk bottle and attached this to the light with Velcro. The light is now softer and spread more evenly on the subject.
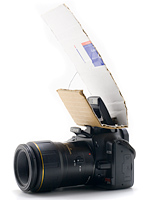
I also fooled around using the on-board camera flash for my macro shots. I devised a cardboard bounce card which I cut from a used USPS box. It works but it’s a bit cumbersome to install. Even with the FEC set, the light from the non-E-TTL flash can be harsh so I devised a diffuser from a plastic milk bottle and attached this to the light with Velcro. The light is now softer and spread more evenly on the subject.
I also fooled around using the on-board camera flash for my macro shots. I devised a cardboard bounce card which I cut from a used USPS box. It works but it’s a bit cumbersome to install.
I do all my macro shots handheld because I like to be able to move easily within my wife’s flower beds and the wild flowers of the countryside. Setting up a tripod to shoot an insect is out of the question. A tripod can be useful, however, to photograph flowers and other inanimate objects. I just prefer to handhold my camera when doing macro work.
Controlled breathing is very useful in handheld macro photography. Since your DOF is very shallow, inhaling and exhaling can move the camera out of focus. You must be able to time your shutter with your breathing, usually depressing the shutter fully on the exhalation cycle. Until I got the timing right, most of my shots were extremely out of focus. Practice makes perfect, but I still do get some out of focus macro pictures.
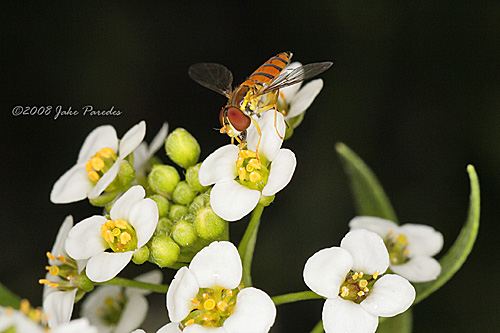
The last thing that I found interesting and quite enjoyable is identifying the bugs I have photographed. I own a book on butterflies but for identification of all the other bugs, I always log in to my account at BugGuide.Net. They have thousands of pictures of different insects. You may be able to identify your bugs by browsing or you can submit an ID request. In about 30 minutes to half-a-day, you will get an answer.
Yes, macros complement my wildlife photography and bring me a greater understanding of nature’s balance and my immediate environment.
Home | Discuss
|